安装前准备
这边最少需要三台机器,所有机器关闭防火墙和Selinux,所有机器需要两块硬盘,
[root@guilin ~]# systemctl stop firewalld
[root@guilin ~]# systemctl disable firewalld
[root@guilin ~]# setenforce 0
[root@guilin ~]# sed -i "s#SELINUX=enforcing#SELINUX=disabled#g" /etc/selinux/config
我是克隆机器对网络及主机名修改
[root@guilin ~]# sed -i 's#100#150#g' /etc/sysconfig/network-scripts/ifcfg-eth[01]
[root@guilin ~]# nmcli connection reload
[root@guilin ~]# hostnamectl set-hostname glusterfs01
[root@guilin ~]# nmcli connection down eth0 && nmcli connection up eth0
添加hosts文件,其实通过IP地址也能做集群,但是不建议这种方式,因为我们通过域名你就是替换节点ip地址只要是域名不变,我们的glusterfs集群还能使用
cat >> /etc/hosts<<'EOF'
10.0.0.150 glusterfs01
10.0.0.151 glusterfs02
10.0.0.152 glusterfs03
EOF
格式化硬盘,我们这边采用/dev/sdb 这个硬盘
fdisk /dev/sdb
Command (m for help): n
Partition type:
p primary (1 primary, 0 extended, 3 free)
e extended
Select (default p): p
然后一路回车,创建磁盘分区
mkfs.xfs /dev/sdb1
[root@glusterfs02 ~]# ls /dev/sdb
/dev/sdb
[root@glusterfs02 ~]# mkfs.xfs /dev/sdb
meta-data=/dev/sdb               isize=512    agcount=4, agsize=1310720 blks
         =                       sectsz=512   attr=2, projid32bit=1
         =                       crc=1        finobt=0, sparse=0
data     =                       bsize=4096   blocks=5242880, imaxpct=25
         =                       sunit=0      swidth=0 blks
naming   =version 2              bsize=4096   ascii-ci=0 ftype=1
log      =internal log           bsize=4096   blocks=2560, version=2
         =                       sectsz=512   sunit=0 blks, lazy-count=1
realtime =none                   extsz=4096   blocks=0, rtextents=0
创建挂载点:
[root@glusterfs01 ~]# mkdir /data
[root@glusterfs01 ~]# mount -t auto /dev/sdb /data
服务端和客户端最好有个ntp时间服务器,确保机器时间一致
搭建ntp时间服务器的教程,请移动到这里
[root@glusterfs01 ~]# ntpdate ntp1.aliyun.com
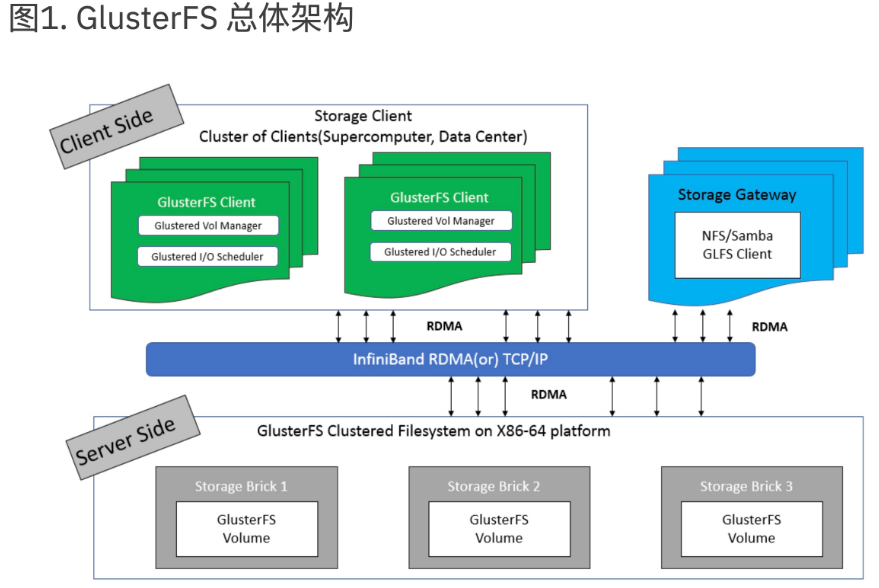
安装Glusterfs 服务
添加安装源,如果不添加无法安装glusterfs-server
[root@glusterfs01 ~]# yum install centos-release-gluster
安装glusterfs服务
[root@glusterfs01 ~]# yum install -y glusterfs glusterfs-server glusterfs-fuse glusterfs-rdma glusterfs-geo-replication glusterfs-devel
启动glusterfs服务
[root@glusterfs01 ~]# systemctl start glusterd.service
[root@glusterfs01 ~]# systemctl enable glusterd.service
初始化集群
将节点加入到glusterfs集群中,需要到三台机器节点上都执行下面命令(本机不需要执行)
[root@glusterfs01 ~]# gluster peer probe glusterfs01
[root@glusterfs01 ~]# gluster peer probe glusterfs02
[root@glusterfs01 ~]# gluster peer probe glusterfs03
注意如果没有配置hosts主机名这个地方是不能进行解析的,
在glusterfs01机器上查看gluster集群
[root@glusterfs01 ~]# gluster peer status
Number of Peers: 2

Hostname: glusterfs02
Uuid: 04e488e2-7d22-4e0a-8935-250ec71084ba
State: Peer in Cluster (Connected)

Hostname: glusterfs03
Uuid: 73ba1622-57d2-4fdc-be7b-c7922839f1e1
State: Peer in Cluster (Connected)
创建设置glusterfs volume
在三台机器上都创建如下目录
[root@glusterfs01 ~]# mkdir /data/pv1
然后在其中任何一台机器上执行下面这个命令
[root@glusterfs01 ~]# gluster volume create gv0 replica 3 glusterfs01:/data/pv1 glusterfs02:/data/pv1 glusterfs03:/data/pv1
[root@glusterfs01 ~]# gluster volume start gv0
注意: 这个地方默认是不可以直接使用挂载点开创建的,需要在挂载点下面创建子目录
查看确认卷已经启动
[root@glusterfs01 ~]# gluster volume info

Volume Name: gv0
Type: Replicate
Volume ID: 0bc7d90c-1358-4f93-9a70-9eb092273aaa
Status: Started
Snapshot Count: 0
Number of Bricks: 1 x 3 = 3
Transport-type: tcp
Bricks:
Brick1: glusterfs01:/data/pv1
Brick2: glusterfs02:/data/pv1
Brick3: glusterfs03:/data/pv1
Options Reconfigured:
transport.address-family: inet
nfs.disable: on
performance.client-io-threads: off
字段解读:
Volume Name: 创建的这个glusterfs卷的名称,客户端挂在的时候回使用到这个内容
Type: Replicate 存储的类型,这个为副本类型
status: 当前这个卷的状态
Number of Bricks: 存储的状态
查看状态
[root@glusterfs01 ~]# gluster volume status
Status of volume: gv0
Gluster process                             TCP Port  RDMA Port  Online  Pid
------------------------------------------------------------------------------
Brick glusterfs01:/data/pv1                 49152     0          Y       2169
Brick glusterfs02:/data/pv1                 49152     0          Y       3400
Brick glusterfs03:/data/pv1                 49152     0          Y       2836
Self-heal Daemon on localhost               N/A       N/A        Y       2190
Self-heal Daemon on glusterfs02             N/A       N/A        Y       3421
Self-heal Daemon on glusterfs03             N/A       N/A        Y       2857

Task Status of Volume gv0
------------------------------------------------------------------------------
There are no active volume tasks
客户端挂在写入数据
安装软件,支持挂在glusterfs格式的文件
[root@guilin ~]# yum install centos-release-gluster -y
[root@guilin ~]# yum install -y glusterfs-6.0-1*   glusterfs-fuse-6.0-1*
在客户端也需要配置hosts解析
cat >> /etc/hosts<<'EOF'
10.0.0.150 glusterfs01
10.0.0.151 glusterfs02
10.0.0.152 glusterfs03
EOF
挂在glusterfs提供的目录
[root@guilin mnt]# mount -t glusterfs glusterfs01:/gv0 /mnt
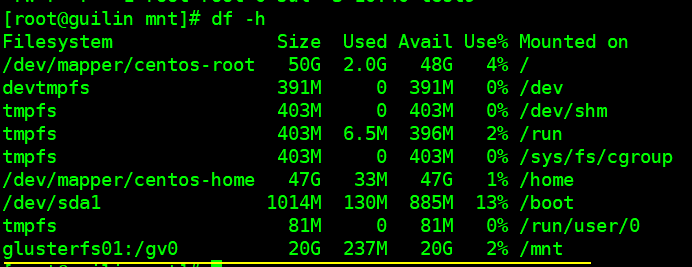
然后写入数据测试
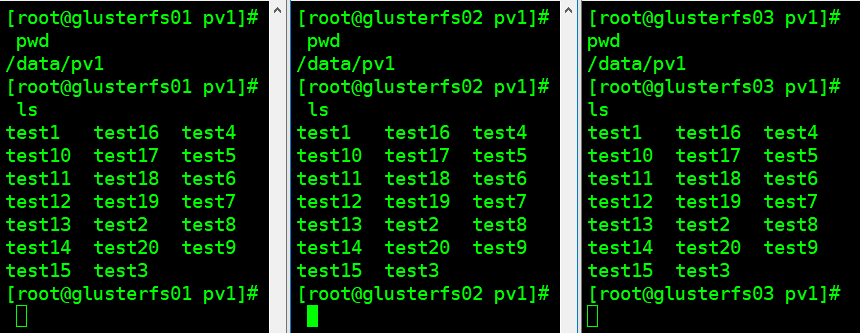
[root@guilin mnt]# touch test{1..20}
然后去glusterfs上面检查文件存不存在

 Asynq任务框架
 MCP智能体开发实战
 WEB架构
WEB架构 安全监控体系