Nginx基本简述
Nginx是一个开源且高性能、可靠的HttpWeb服务、代理服务。
开源: 直接获取源代码
高性能: 支持海量并发
可靠: 服务稳定
1.常见的 HTTP Web服务
Httpd 由Apache基金会
IIS 微软服务器版
GWS Google开发
Openrestry 基于nginx+lua
Tengline 淘宝基于Nginx开发
2.为什么选择 Nginx
1.Nginx非常轻量
1.功能模块少(源代码仅保留http与核心模块代码,其余不够核心代码会作为插件来安装)
2.代码模块化(易读,便于二次开发,对于开发人员非常友好)
2.互联网公司都选择Nginx
1.Nginx技术成熟, 国内公司基本大规模使用
2.适合当前主流架构趋势, 微服务、云架构、中间层
3.统一技术栈, 降低维护成本, 降低技术更新成本。
3.Nginx采用Epool网络模型, Apache采用Select模型
Select: 当用户发起一次请求,select模型就会进行一次遍历扫描,从而导致性能低下。
Epool: 当用户发起请求,epool模型会直接进行处理,效率高效,并无连接限制。
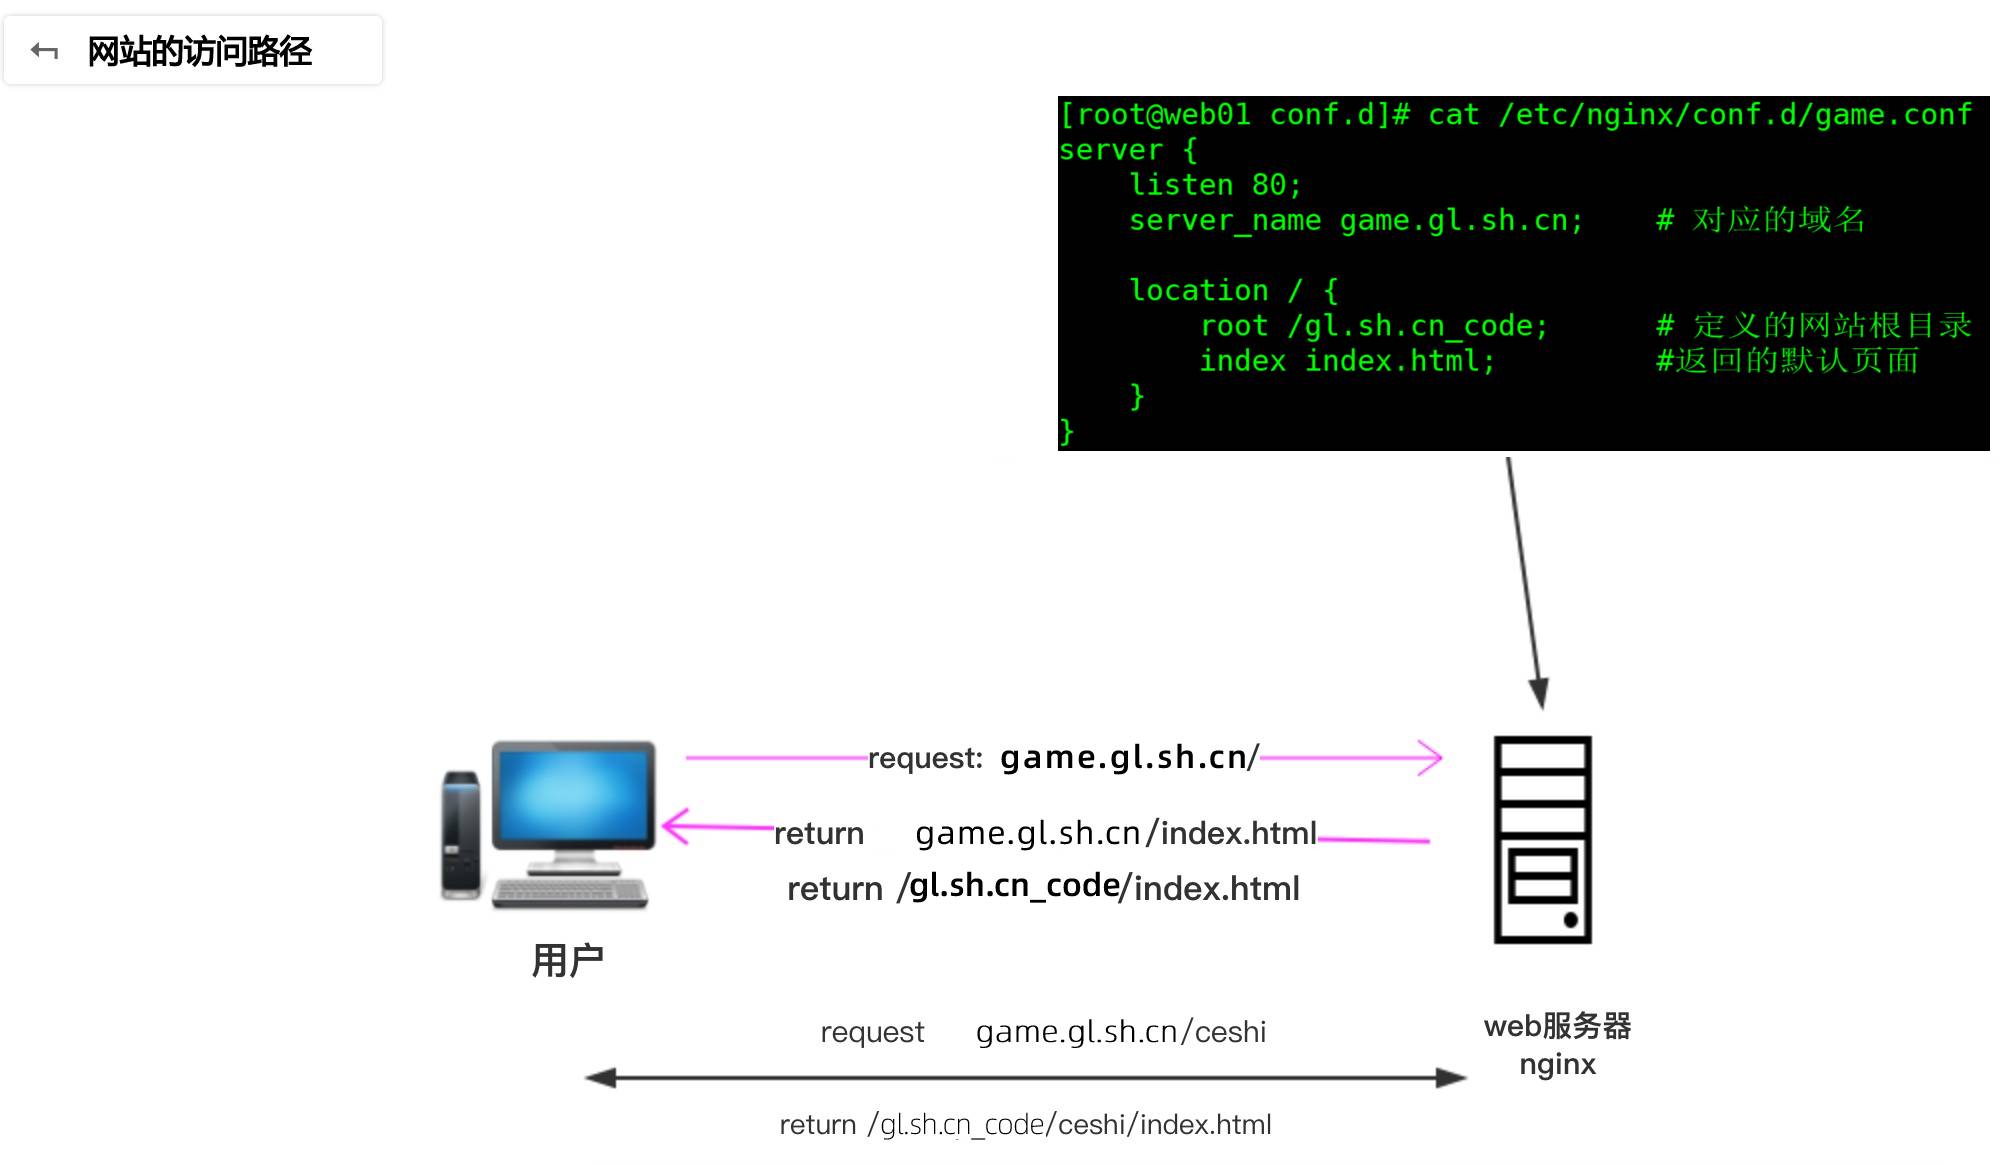
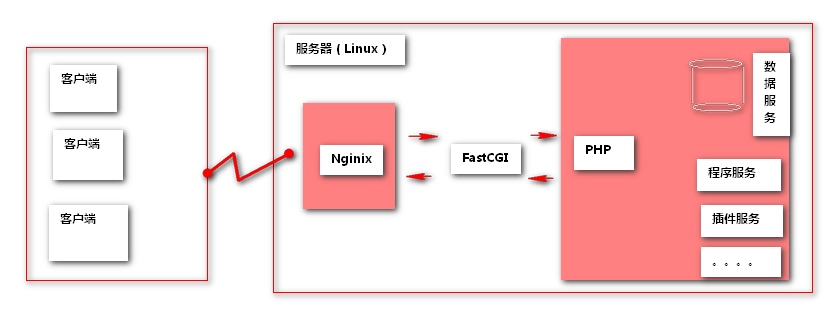
3.Nginx 应用场景
Nginx快速安装
Nginx软件安装的方式有很多种
1.源码编译=>Nginx (1.版本随意 2.安装复杂 3.升级繁琐)
2.epel仓库=>Nginx (1.版本较低 2.安装简单 3.配置不易读)
3.官方仓库=>Nginx (1.版本较新 2.安装简单 3.配置易读 √)
1.安装Nginx软件所需依赖
#基本安装包
[root@web ~]# yum install -y gcc gcc-c++ autoconf \
pcre pcre-devel make automake wget httpd-tools vim tree
2.配置nginx yum源[必须使用官方源]
[root@web ~]# vim /etc/yum.repos.d/nginx.repo
[nginx]
name=nginx repo
baseurl=http://nginx.org/packages/centos/7/$basearch/
gpgcheck=0
enabled=1
3.安装Nginx服务
[root@web ~]# yum install nginx -y4.检查Nginx软件版本
[root@web ~]# nginx -v
nginx version: nginx/1.14.05.为了让大家更清晰的了解Nginx软件的全貌,可使用rpm -ql nginx查看整体的目录结构及对应的功能
如下表格对Nginx安装目录做详细概述
| 路径 | 类型 | 作用 |
|---|---|---|
/etc/nginx /etc/nginx/nginx.conf /etc/nginx/conf.d/etc/nginx/conf.d/default.conf |
配置文件 | Nginx主配置文件 |
/etc/nginx/fastcgi_params /etc/nginx/scgi_params /etc/nginx/uwsgi_params |
配置文件 | Cgi、Fastcgi、Uwcgi配置文件 |
/etc/nginx/win-utf /etc/nginx/koi-utf /etc/nginx/koi-win |
配置文件 | Nginx编码转换映射文件 |
/etc/nginx/mime.types |
配置文件 | http协议的Content-Type与扩展名 |
/usr/lib/systemd/system/nginx.service |
配置文件 | 配置系统守护进程管理器 |
/etc/logrotate.d/nginx |
配置文件 | Nginx日志轮询,日志切割 |
/usr/sbin/nginx /usr/sbin/nginx-debug |
命令 | Nginx终端管理命令 |
/etc/nginx/modules /usr/lib64/nginx /usr/lib64/nginx/modules |
目录 | Nginx模块目录 |
/usr/share/nginx /usr/share/nginx/html /usr/share/nginx/html/50x.html /usr/share/nginx/html/index.html |
目录 | Nginx默认站点目录 |
/usr/share/doc/nginx-1.12.2 /usr/share/man/man8/nginx.8.gz |
目录 | Nginx的帮助手册 |
/var/cache/nginx |
目录 | Nginx的缓存目录 |
/var/log/nginx |
目录 | Nginx的日志目录 |
6.通过nginx -v查看Nginx编译选项
| 编译选项 | 作用 |
|---|---|
--prefix=/etc/nginx --sbin-path=/usr/sbin/nginx --modules-path=/usr/lib64/nginx/modules --conf-path=/etc/nginx/nginx.conf --error-log-path=/var/log/nginx/error.log --http-log-path=/var/log/nginx/access.log --pid-path=/var/run/nginx.pid --lock-path=/var/run/nginx.lock |
程序安装目录和路径 |
--http-client-body-temp-path=/var/cache/nginx/client_tem --http-proxy-temp-path=/var/cache/nginx/proxy_temp --http-fastcgi-temp-path=/var/cache/nginx/fastcgi_temp --http-uwsgi-temp-path=/var/cache/nginx/uwsgi_temp --http-scgi-temp-path=/var/cache/nginx/scgi_temp |
临时缓存文件 |
--user=nginx --group=nginx |
设定Nginx进程启动用户和组(安全) |
--with-cc-opt |
设置额外的参数将被添加到CFLAGS变量 |
--with-ld-opt |
设置附加的参数, 链接系统库 |
Nginx配置文件
Nginx主配置文件/etc/nginx/nginx.conf是一个纯文本类型的文件,整个配置文件是以区块的形式组织的。一般,每个区块以一对大括号{}来表示开始与结束。
1.CoreModule 核心模块
2.EventModule 事件驱动模块
3.HttpCoreModule http内核模块需了解扩展项
CoreModule层下可以有Event、HTTP
HTTP模块层允许有多个Server层, Server主要用于配置多个网站
Server层又允许有多个Location, Location主要用于定义网站访问路径
CoreModule核心模块
user www;                       #Nginx进程所使用的用户
worker_processes 1;             #Nginx运行的work进程数量(建议与CPU数量一致或auto)
error_log /log/nginx/error.log  #Nginx错误日志存放路径
pid /var/run/nginx.pid          #Nginx服务运行后产生的pid进程号
events事件模块
events {
    worker_connections  //每个worker进程支持的最大连接数
    use epool;          //事件驱动模型, epoll默认
}
http内核模块
//公共的配置定义在http{}
http {  //http层开始
...
    //使用Server配置网站, 每个Server{}代表一个网站(简称虚拟主机)
    'server' {
        listen       80;        //监听端口, 默认80
        server_name  localhost; //提供服务的域名或主机名
        access_log host.access.log  //访问日志
        //控制网站访问路径
        'location' / {
            root   /usr/share/nginx/html;   //存放网站代码路径
            index  index.html index.htm;    //服务器返回的默认页面文件
        }
        //指定错误代码, 统一定义错误页面, 错误代码重定向到新的Locaiton
        error_page   500 502 503 504  /50x.html;
    }
    ...
    //第二个虚拟主机配置
    'server' {
    ...
    }

    include /etc/nginx/conf.d/*.conf;  //包含/etc/nginx/conf.d/目录下所有以.conf结尾的文件

}   //http层结束
Nginx配置网站
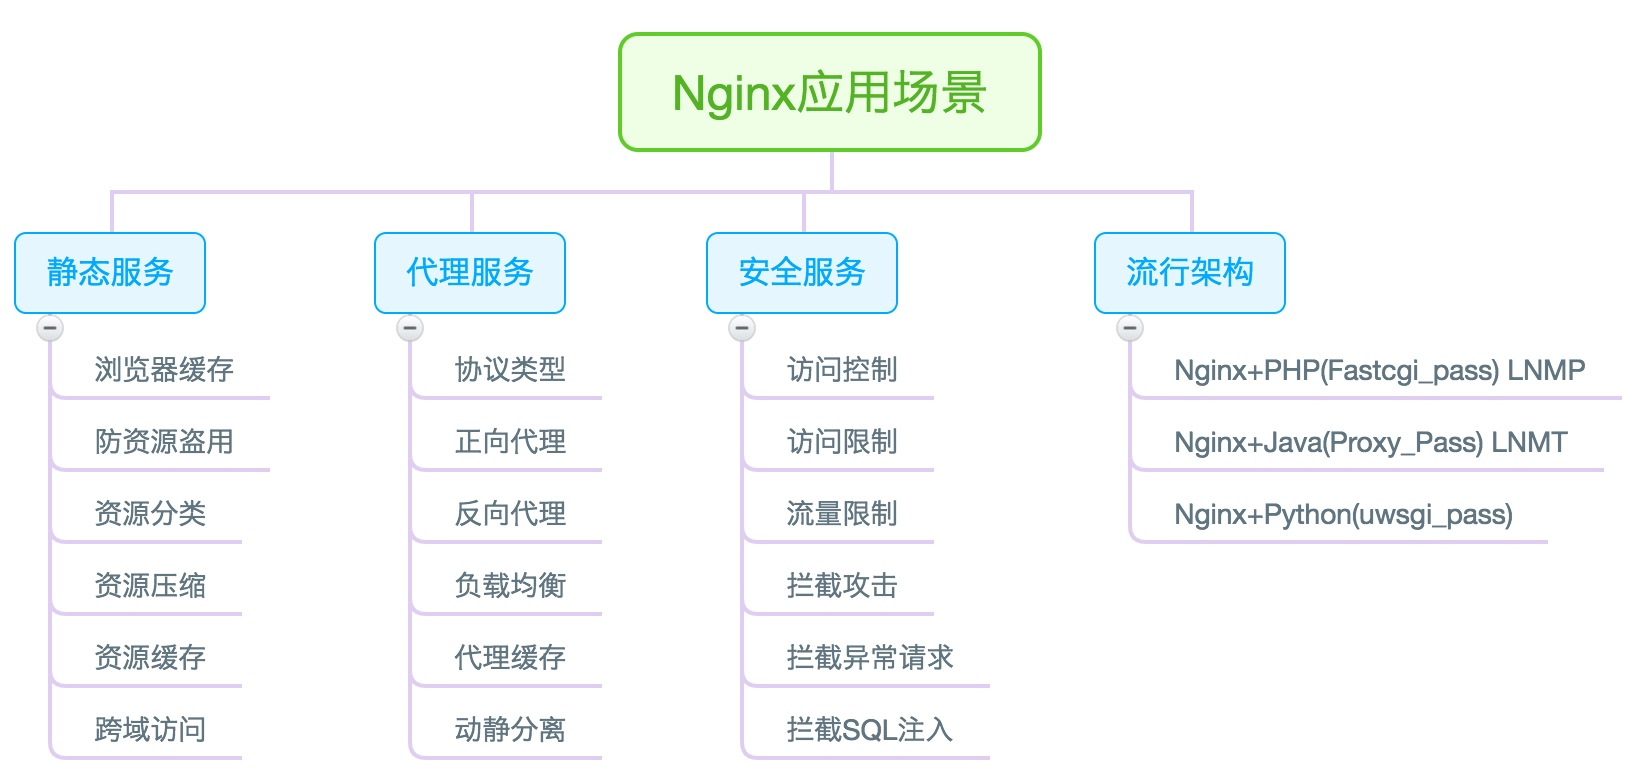
1.新增nginx配置文件
[root@web01 conf.d]# cat /etc/nginx/conf.d/game.conf
server {
    listen 80;
    server_name game.gl.sh.cn;

    location / {
        root /gl.sh.cn_code;
        index index.html;
    }
}
2.放置对应的源代码文件至指定的目录
[root@web01 conf.d]# mkdir /gl.sh.cn_code
[root@web01 conf.d]# cd /gl.sh.cn_code/
[root@web01 gl.sh.cn_code]# rz  html5.zip
[root@web01 gl.sh.cn_code]# unzip html5.zip
[root@web01 gl.sh.cn_code]# ls
ceshi  game  html5.zip  img  index.html  readme.txt
3.检查nginx的语法是否存在错误
[root@web01 gl.sh.cn_code]# nginx -t
nginx: the configuration file /etc/nginx/nginx.conf syntax is ok
nginx: configuration file /etc/nginx/nginx.conf test is successful
4.重载Nginx [reload|restart]
[root@web01 gl.sh.cn_code]# #nginx -s reload
[root@web01 gl.sh.cn_code]# systemctl reload nginx
5.如何访问对应的网站
1.通过服务器的IP直接访问(不推荐)
2.通过假域名方式访问(推荐方式)
Windows修改 C:\Windows\System32\drivers\etc\hosts
10.0.0.7   game.gl.sh.cn
3.使用ping命令测试域名解析是否正常
6.网站访问路径

 Asynq任务框架
 MCP智能体开发实战
 WEB架构
WEB架构 安全监控体系